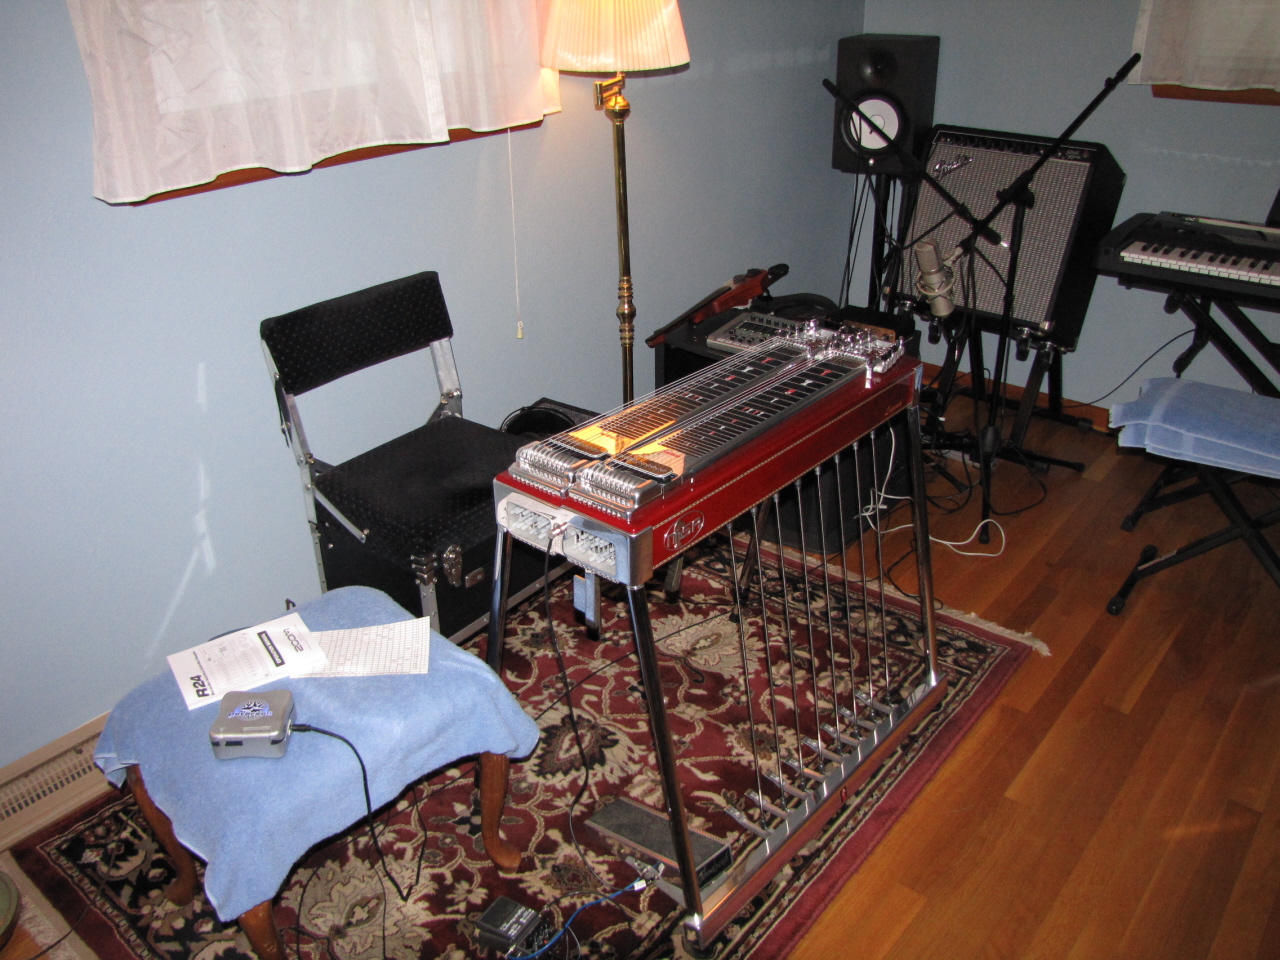
Home Recording Studio Based On Zoom R24


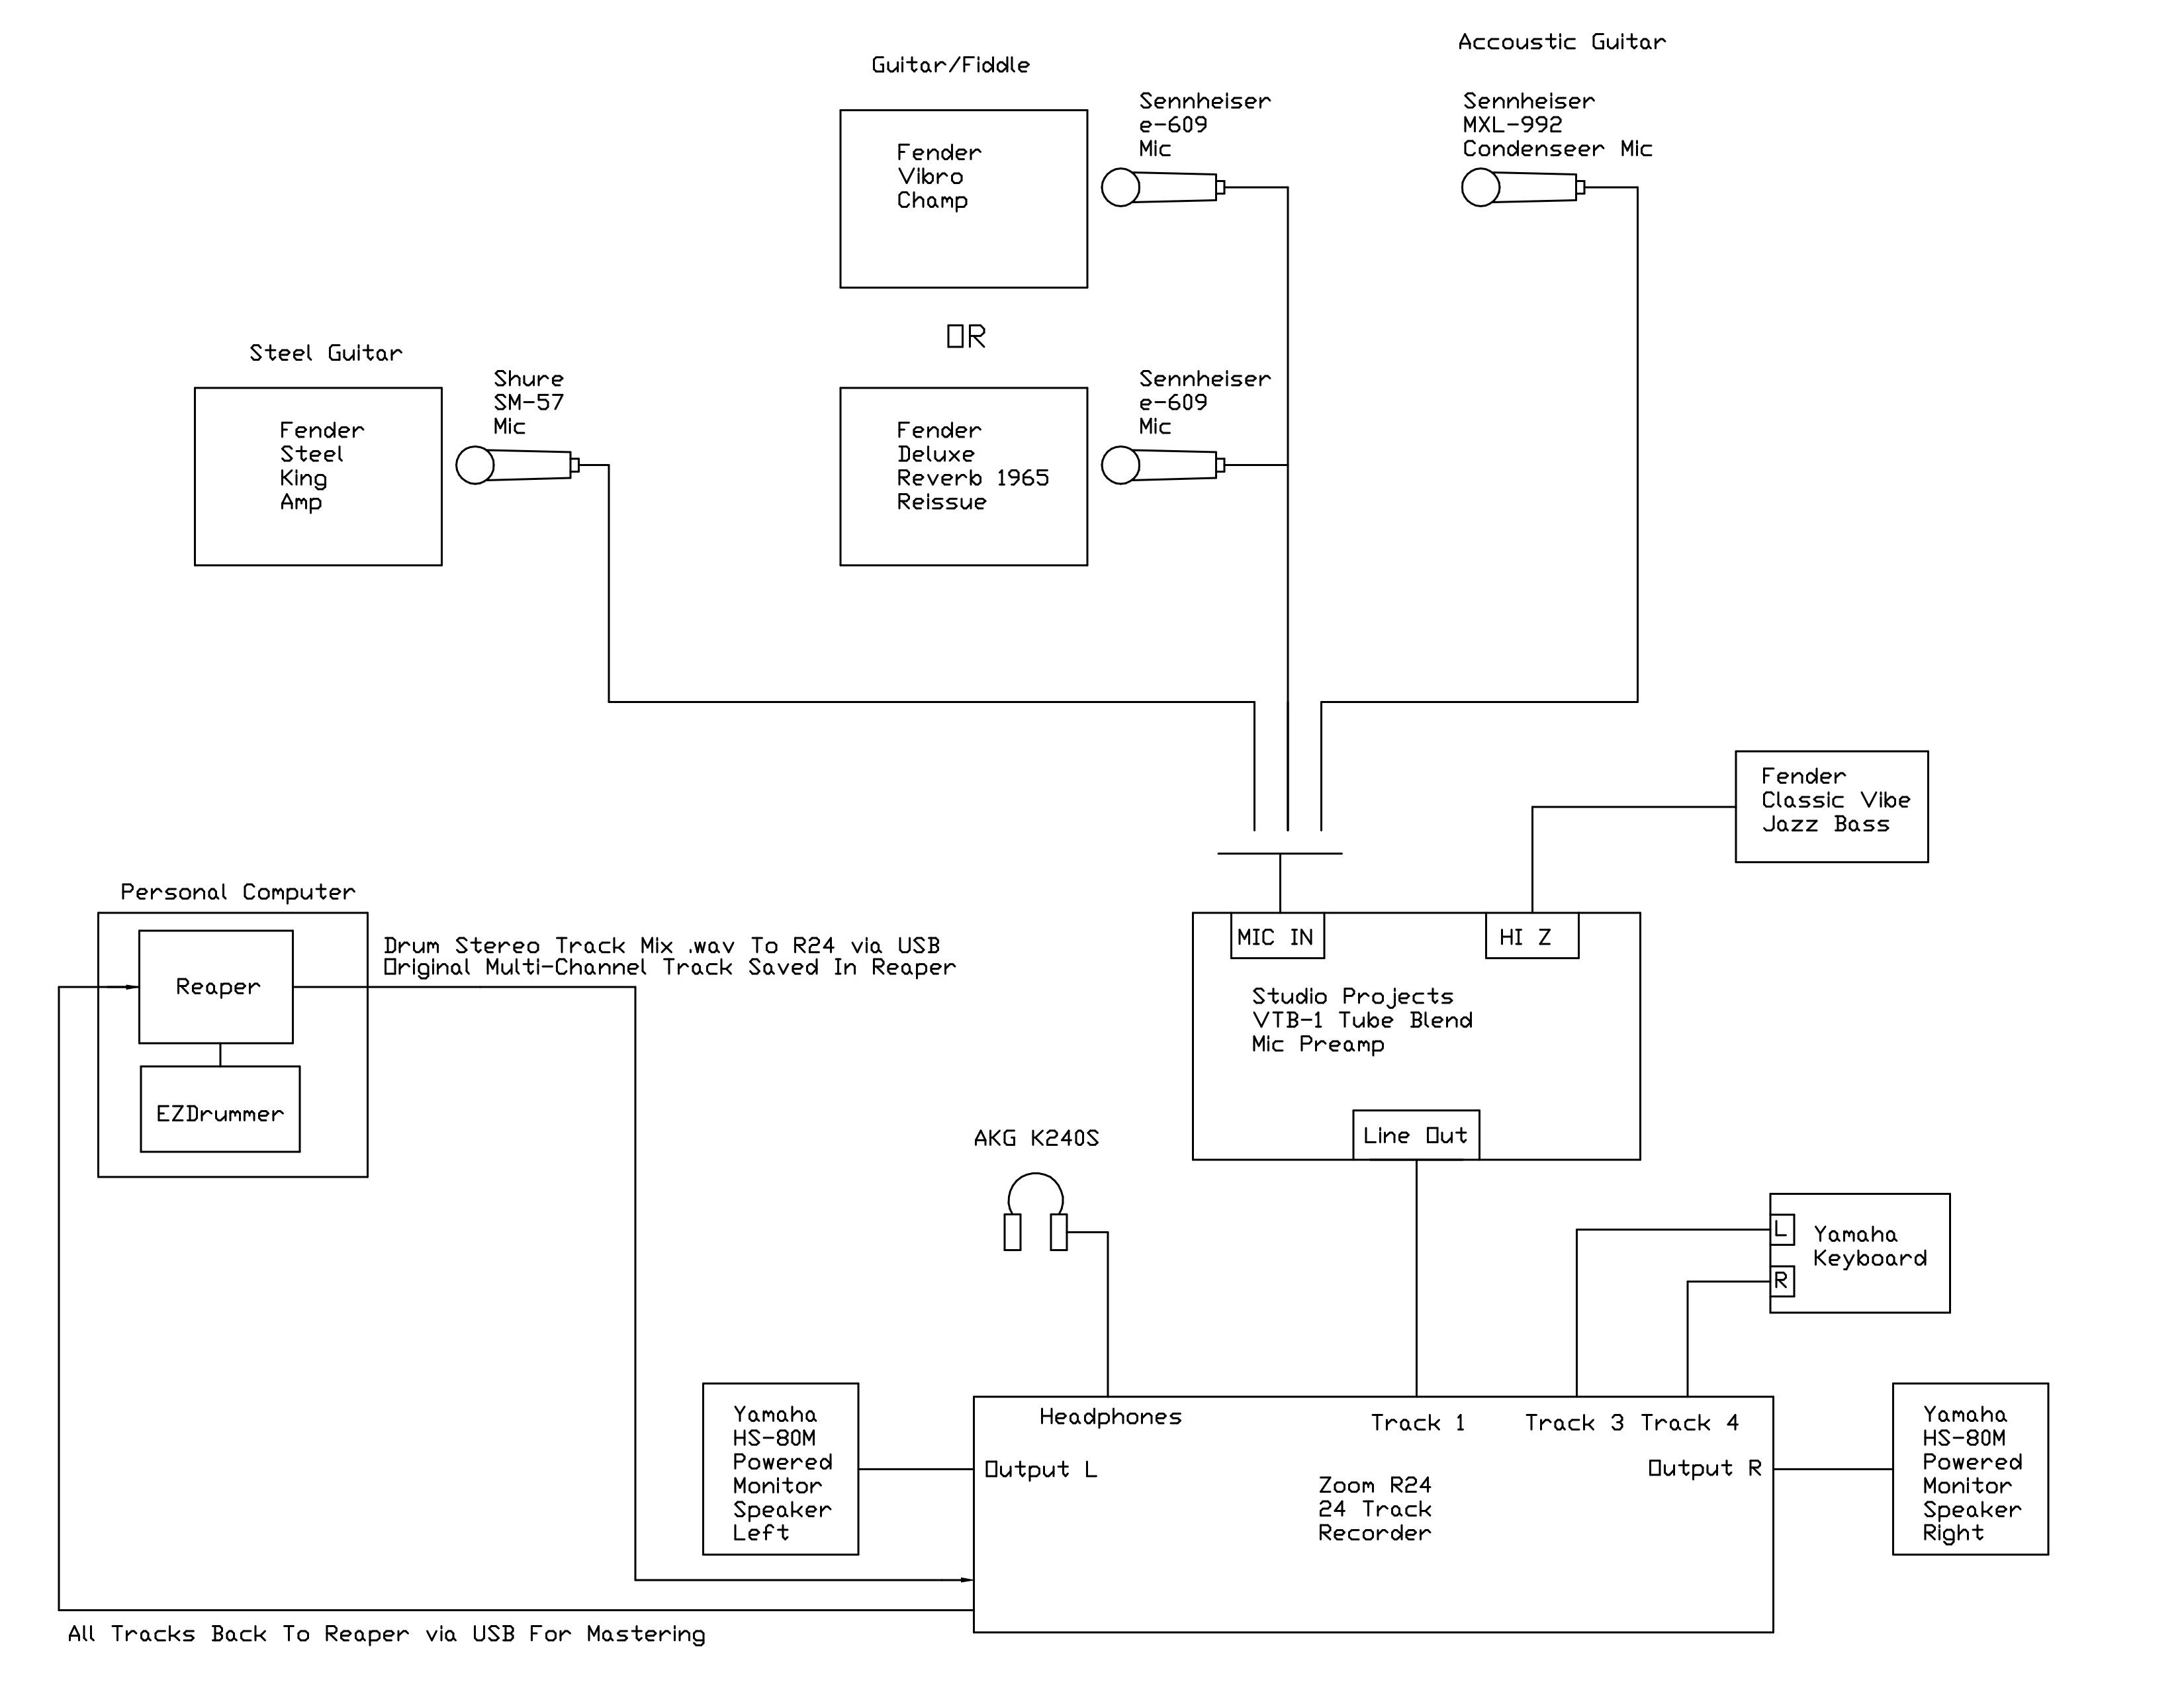
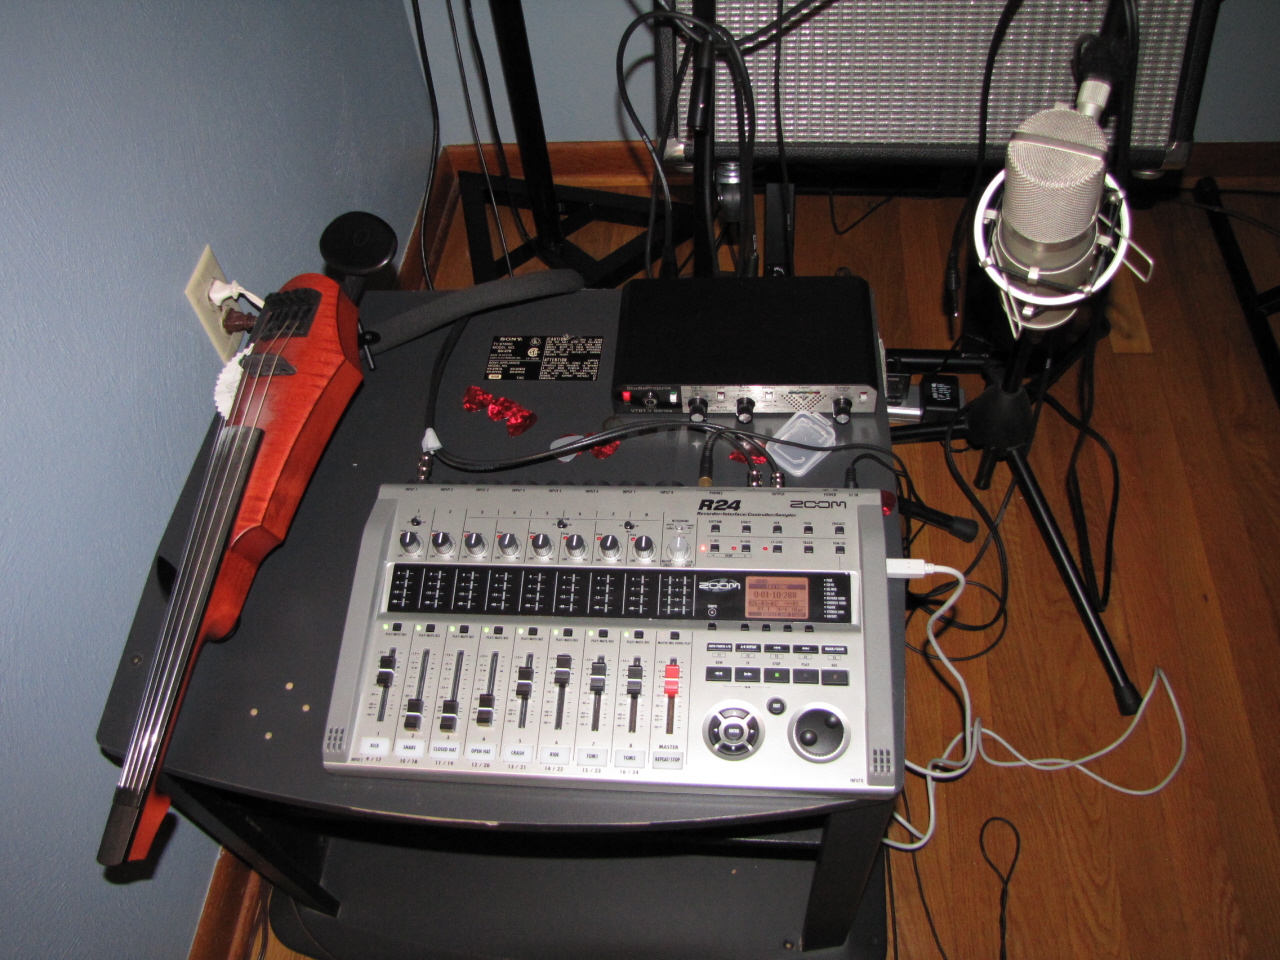
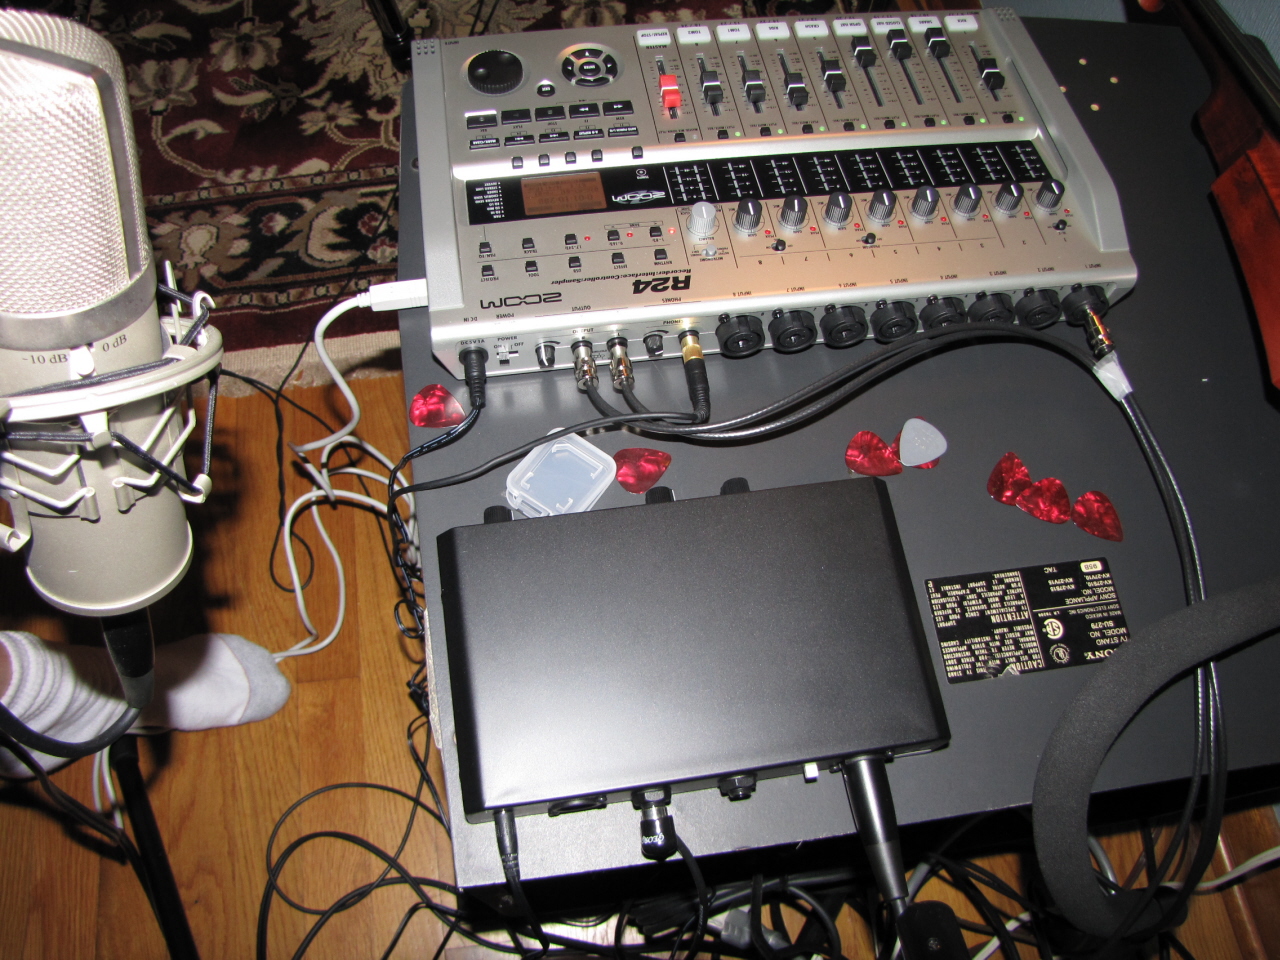
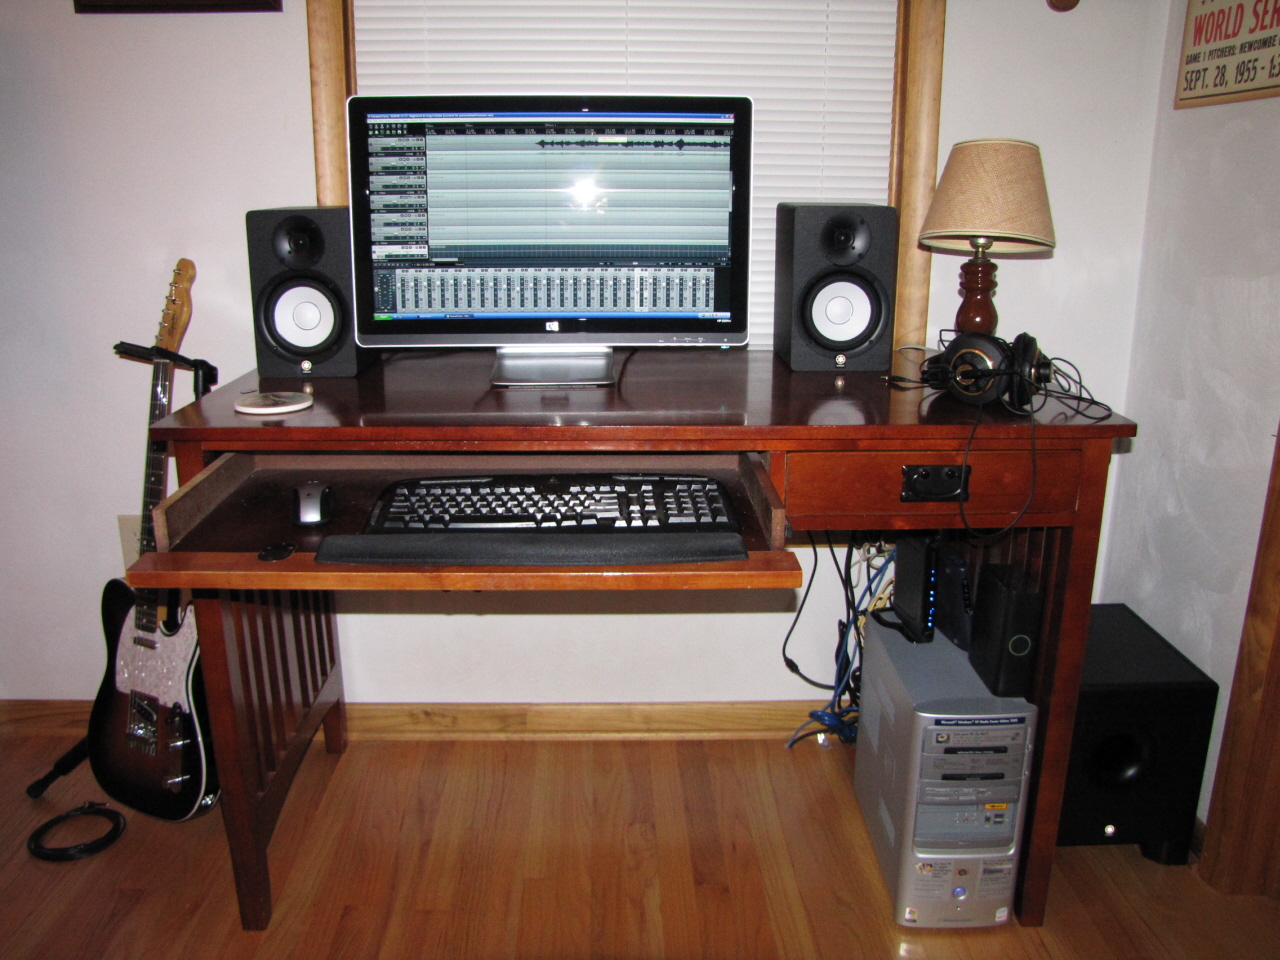
Here's my new setup. The Yamaha AW-2400 is gone and has been replaced with a Zoom R24 recorder, a Studio Project VTB-1 preamp and a really powerful DAW called Reaper. You can read about my recording process below and there are many great web sites to read about reviews on these great products so there's no need for me to cover the basics here.

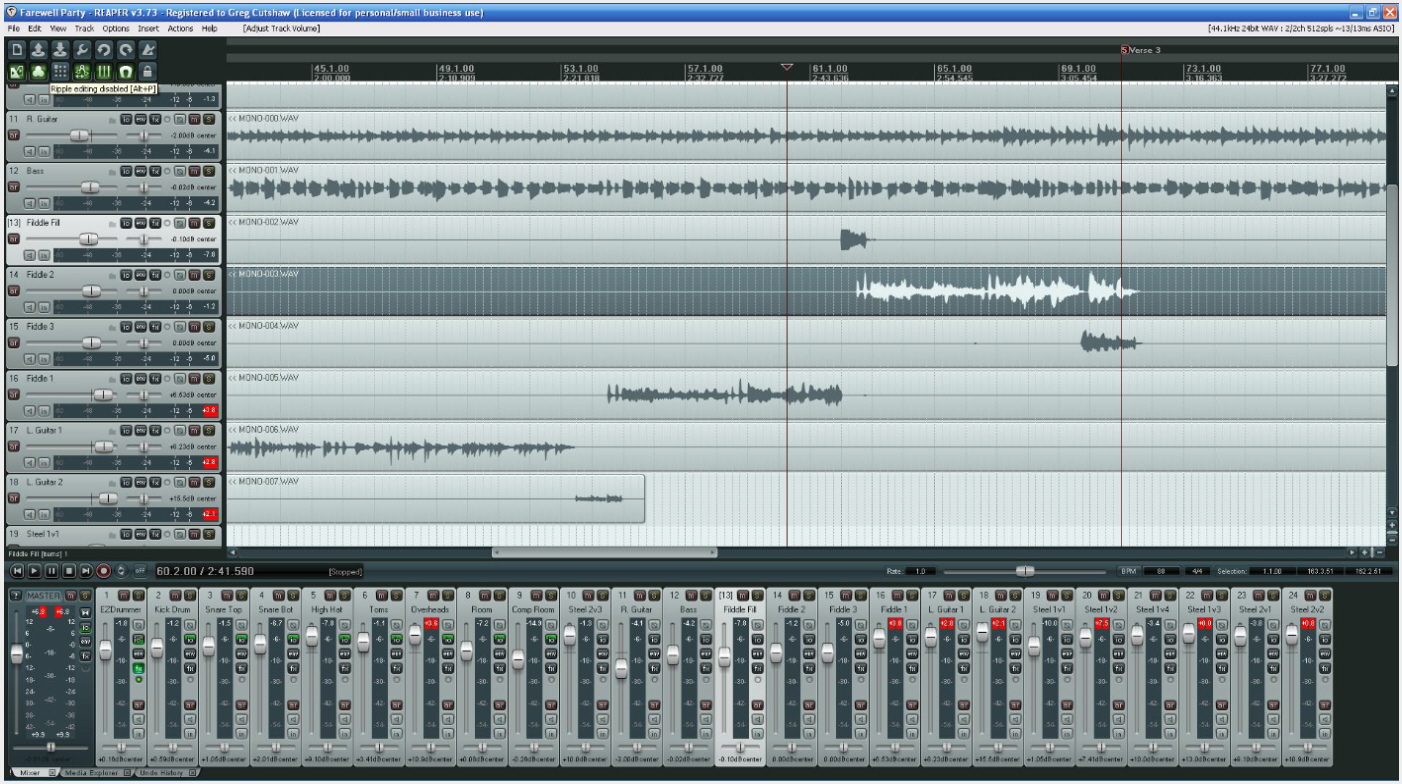
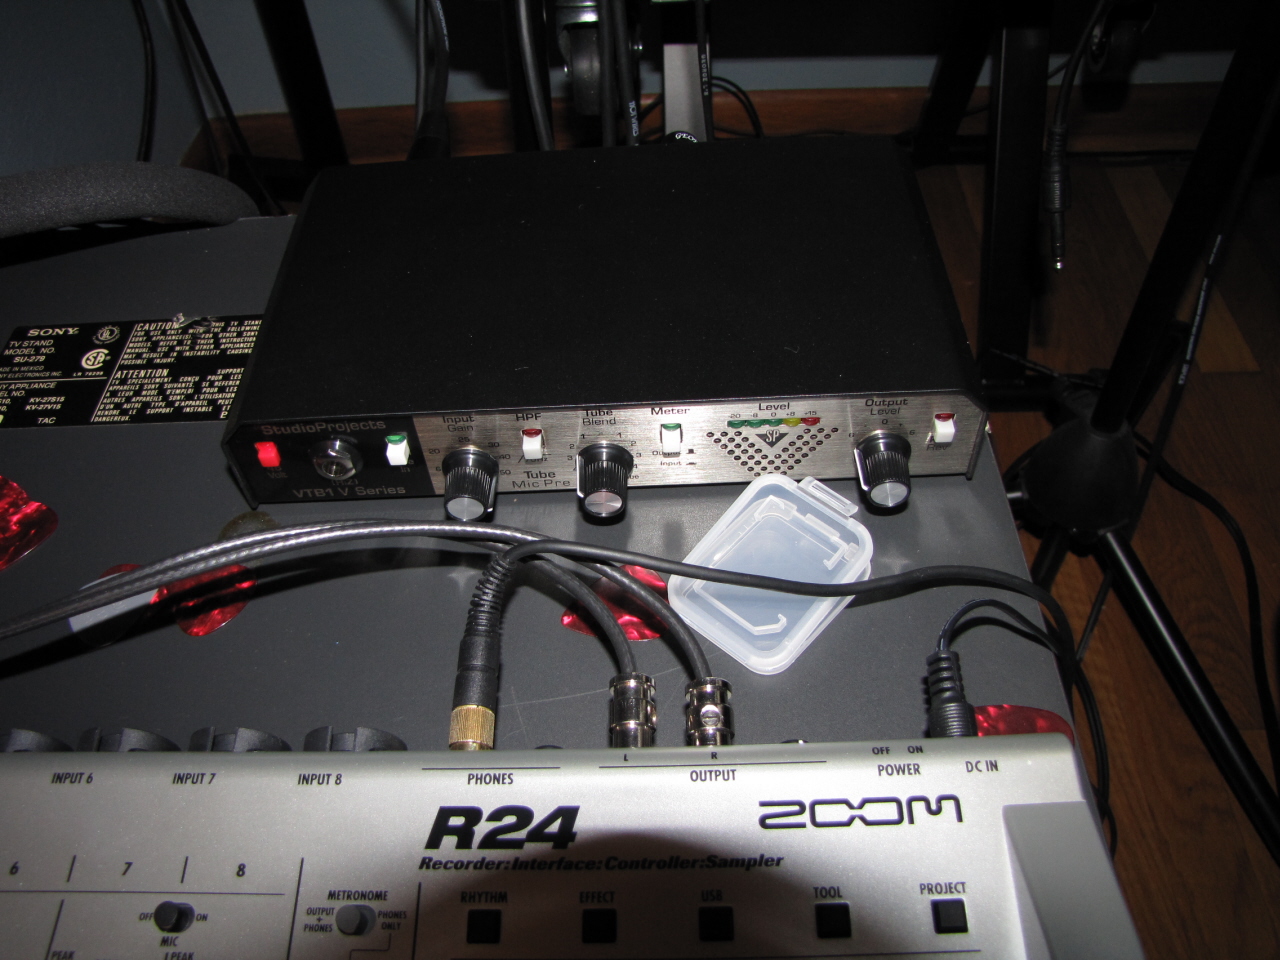
With the Zoom R24 I am eliminating the bulky AW-2400, it's hard drive and the noisy scooped midrange preamps. The AW-1600 had very accurate and evenly EQ'd preamps but both units were heavily laden with white noise. I have run the VTB-1 between my steel guitar and my Fender Steel King and it is NOISELESS!!! when set on unity gain. The tube blend control on the VTB-1 adds a very audible tube warmth (nothing as dramatic as a real high voltage tube amp feeding real speakers) at lower settings and a mild distortion at the highest settings. When used with my Shure SM-57 mic, there is no white noise coming out of the VTB-1 other than that generated by the amp. I could never get this low of a noise level on my Yamaha setups. Now I can let the steel parts trail off and even as they almost die, there is no background hiss. This is pretty awesome. The VTB-1 actually does what all the reviewers and shills on Musician's Friend says it will do. I get the same low noise whether using the dynamic mic input on the back or the high Z input on the front panel. Please note that the VTB-1 is TINY! It looks huge on the web site but it is actually a very tiny box with a small footprint.

The R24 is not motorized and does not have the slick useability of the AW-2400. It does record what you hear however with no further EQ adjustments needed. And I can do as many tracks as I want in 24 bits. Note that the R24 can play back 24 tracks at one time but you can record a lot more tracks than that and just save them as files. These files can be alternate takes or they can be primary tracks. It also can display the audio waveform, does automatic punch in and punch out, has 100 markers and tons of effects. Reverb and delay is available to all input and track channels as a send effect or as an insert effect. You can even add reverb and delay to just the monitoring channel so it will not be recorded on the 24 tracks or the master track. There are separate line out (feeds my monitor speakers) and headphone level controls on the back. This makes it easy to kill the monitors and just have sound through the headphones when you are recording new tracks.

Here's the first complete song recorded on my R24 and mastered in Reaper

Farewell Party - Hear It!

Farewell Party Track - Hear It!

Here's some newer material with 3 part fiddle and ledal steel with more advanced compression, volume envelopes and L/R panning

What A Way To Live - Hear It!

Silver Dew On The Bluegrass Tonight - Hear It!


I don't use the R24 for individual track editing or mastering to a stereo track. It is capable of these things but they are tedious to do on the small screen and Reaper excels at these things. I do however use the punch in/out a lot to record over pieces of tracks or to record difficult tracks piece by piece. I don't care for the R24 drum tracks and prefer either EZDrummer or a drum machine for ease of editing. There is a company that makes a stand alone PC program for creating R24 drum tracks and it works much like a midi sequencer and would probably be a great way to go as well (the current introductory price is only $30). I bought a Transcend 16GB Class 10 SDHC Card (TS16GSDHC10) from Amazon.com for $26.99 ( See it! ) and it will easily hold 16 complete projects. The R24 comes with both host and slave USB ports so you can connect to a laptop and access the R24 SD card files for upload and download but you can also use a USB thumb drive in the R24 to store and retrieve data. This would mean you can port tracks into and out of the R24 without needing a laptop connection or even a computer nearby!

R24 At Musician's Friend

Studio Projects VTB-1 At Musician's Friend

Reaper Home Page


Comments After A Few Days Of Use

  1. The USB thumb drive that comes with the R24 will not format for use with R24 user data until you update the R24 operating system to level 1.10
  2. There is only ONE insert effect. You can not add a compressor to more than one track channel at a time, for example.
  3. Editing tracks on the R24 is really primitive. I find it easier to dump a track to the USB thumb drive, edit it on Reaper on my desktop PC and dump it back to the R24. Doing this as the project progresses makes the final editing/mastering job much easier and allows you to hear a more finished version on the R24
  4. The built-in send/receive reverb is decent as is the insert rack compressor.
  5. I downloaded the Ambience plug in for Reaper and the reverbs are AWESOME! I can easily get anything from room to hall and duplicate the Lexicon and Boss RV-5 reverbs!!!
  6. I am considering adding the Yamaha HSM-50 monitors and an HP 25" widescreen display to my desktop computer to aid in mastering

I recorded my first complete song on this beast, Farewell Party with Drums, Lead Guitar, Pedal Steel, Bass, Rhythm Guitar and Fiddle on a total of 24 tracks. Along the way I sent tracks back and forth between the R24 and Reaper to clean up some audio and edit out parts of tracks I didn't want to keep. Doing this along the way makes for less editing at the end and a better mix to listen to at the R24 as you go along. The total of all the audio tracks excluding the drums was 401 MBytes. I was able to dump the R24 tracks to a USB thumb drive in about 5 minutes then load the thumb drive into the Reaper directory in under a minute.

My Reaper computer station has been upgraded. After listening to the Yamaha HS-80M monitors on the R24 setup, I decided I needed better monitoring speakers on the Reaper PC. These are now Yamaha HS-50M's (5" woofer) which I got for $323 a pair out the door and the Yamaha HS-10W 8" subwoofer which was on sale for $323 out the door. My PC is a 2 year old HP running Windows XP, Intel Core 2 6300 1.86 Ghz CPU with 2GB ram and a 230 GB hard drive and a 160 GB back up drive. The monitor is a 25" widescreen HP 2509 ($250 delivered). I may not use the subwoofer for mixing but it sure makes playing music a blast! See below for a Reaper screen shot with Farewell Party all set up. The big monitor makes it a cinch to have all your faders handy without resorting to folders or busses.

A few notes after spending an initial 2 hours with the Repare mix. I normalized all the tracks to -6db with each tracks faders set at zero. Note that normalization does NOT compress or otherwise alter the dynamics of the waveforms. It merely takes the highest point in the waveform, figures out how much to add or subtract from it to get it to -6db, and applies that to the whole waveform. At this point your lead part track's faders are all set to zero and you can listen to the mix and hear a lot more eveness to the volume from track to track. I should also add that I rearranged the lead tracks from top to bottom to appear in the chronological order that they are in the song so that the next track you hear will always be the track under (in track view) and to the right (in mixer view) to the one you are listening to. At the same time I also rename the tracks to Steel 1v1 (steel part, verse 1, part 1), Steel 1v2 (Steel part,verse 1, part 2), L. Guitar 1, L Guitar 2 etc. This only takes a few minutes and really makes identifying what your editing or listening to very clear. The next step is to add and arm volume envelopes on all the lead parts that are extremely uneven. See a Reaper screen shot of this below. Zoom way in on the waveform, drag the volume envelope up and down to control the gain, and voila! All the major peaks and valleys are gone without resorting to compression!

All reverbs were recorded live onto the R24 tracks except on the second fiddle part I added the Ambience vst reverb plug in set on hall. The only compression is on the lead guitar part and there I used the VST:ReaComp(Cockos). There is also a touch of vst EQ on the lead guitar. One final (yeah right) note... I decided to add an EQ vst on the master bus to bump up the mid-range and treble. The mix was mastered to sound good to my ears on the Yamaha HS-50M's with the HS-10W subwoofer off but also sounded good on the headphones (what doesn't?) The HS-50M's have a bit of a hollow mid range sound compared to the HS-80M's and I may decide to swap them to the desktop. The wma files posted above were encoded at 192kbps and to my shot ears, sound darn close to the original .wav as far as dynamics and highs. The .wav file is 78 MBytes! This was a huge load of work for me learning Reaper, the R24, Studio Premamp, putting the desktop together and trying to play all the instruments. I practiced the guitar part for a bit then laid down the tracks for it without retuning so there's a few flat notes that drive me crazy. This is my first pass at all this and one of things I noticed right away in the monitors is that my volume envelopes were way too abrupt (you can hear them kick in and out) so I've got a bit of learning there but every project reaches a point where you just want to complete it and move on. I spent about 3 weeks on all of this from scratch and here it is 3 AM in the morning and it's time to SHIP IT. Countless more hours could be spent making this thing sound professional and I'm just not willing to do that for a home recording project.............

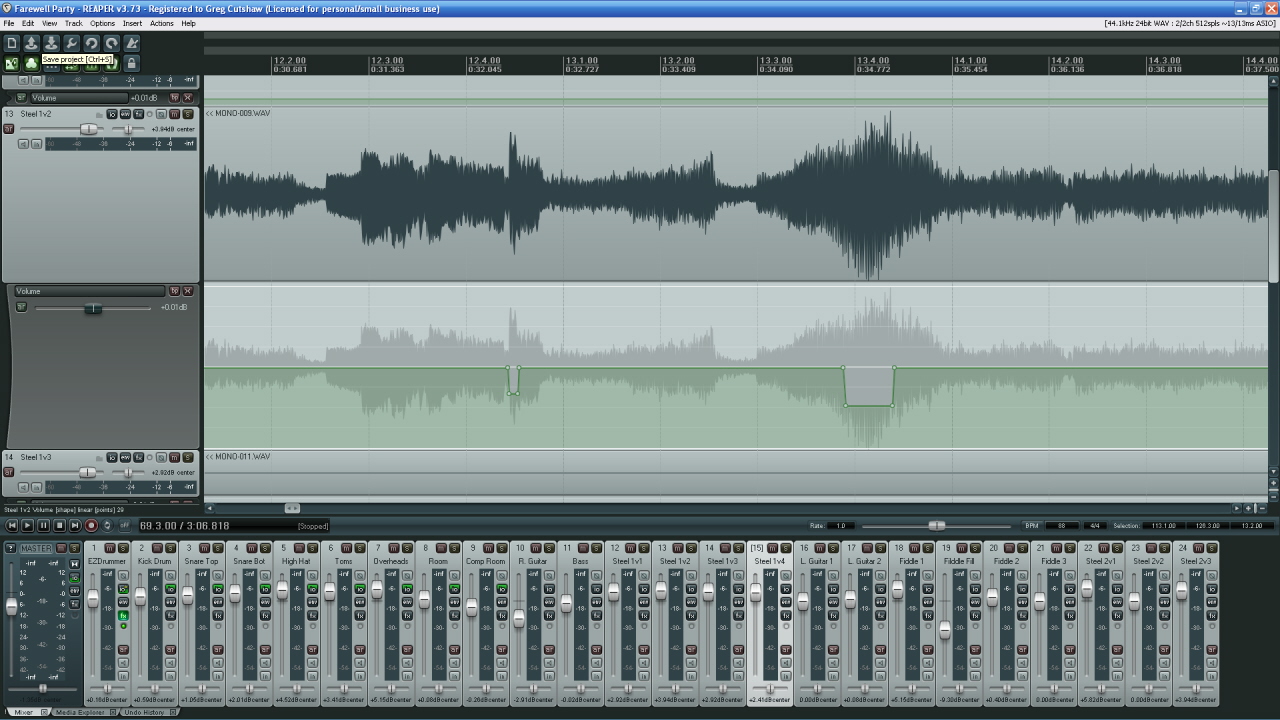
Reaper Screen Shot Showing A Volume Envelope On A Steel Part


Recording Process

  • Lay out chord charts and drum patterns in Excel (email me for Excel file sample)
  • Excel file example
  • Excel file in pdf format
  • Create custom drum patterns using Toontracks EZDrummer with Nashville pack. Created and midid edited inside of Reaper.
  • Render drum to a 24 bit stereo .wav in Reaper. Transfer the file to Zoom R24 on tracks 23/24
  • Note that the original 6 tracks of drums are maintained in Reaper for later use in the final mastering
  • Reaper automatically knows that the drum tracks is stereo and assigns it to a stereo track when I load the drum .wav file to track 24
  • Record the rhythm guitar to R24 track1 then bounce to track 22
  • Record the bass guitar to R24 track 1 then bounce to track 21
  • Record the fiddle, lead parts to R24 track 1 then bounce to highest available tracks. As needed I plug different mics into the VTB-1 back mic input.
  • Record keyboard to R24 tracks 3 and 4 then bounce up to highest available tracks.
  • For all the above tracks, I set the VTB-1 input level to about 3 bars, then adjust the VTB-1 output level to 3 bars
  • Then adjust the R24 input level to avoid clipping by assuring that the input LED flashed only briefly
  • Note that the above process avoids plugging and unplugging cords into different R24 inputs. It also takes advantage of the VTB-1 low noise preamp!
  • Record steel parts sequentially on R24 track 1 and bounce to higher tracks
  • After all parts are recorded in time with the previously loaded stereo drum track, copy all but the stereo drum track back to Reaper
  • Reaper is used to render both the rhythm track and complete song. 24 bit, 44.1 Khz audio is maintained in the R24 and Reaper
  • In Reaper, Individual compression and manual level editing using volume envelopes (to level out the lead parts) and in some cases additional reverb is added at this stage
  • I don't record dry because I prefer to use my effects and hear what the final track will sound like up front. I know this is not ideal for editing!
  • Now I render the rhythm track to a 24 bit .wav file
  • Then the extra drum part in front of the song is edited out (it is only needed as an intro to the rhythm track) and the final song is rendered to a 24 bit .wav file
  • The above rendering uses all 6 or 7 drum tracks that were originally created in Reaper
  • To post on my web site I use the Windows Audio Media Converter to convert the .wav file to a 192k bps .wma file.

    Comments? email webmaster Greg


    Home